These pictures and/or suggestions derive from personal opinions and are meant as guidelines only. They are in no way hard and fast rules as to the "correct" way to do this puzzle or game action. |
Duty navigation multiplies the efforts of your sailors when on a ship. The better the score done by the navigator, the better the multiplication. Because of this, navigation is most advantageous when transporting commodities long distances while avoiding engagements or when attempting to return to port after a pillage while avoiding engagements. Navigation also allows for memorization of the ocean. The following tutorial touches upon numerous aspects of navigation technique and common situations.
Keeping in mind that Duty Navigation helps to spawn the types of ships you have configured your voyage for; it is also notable that when engaging in a PvP one may receive a message saying “Ye Were Out Maneuvered.” This message will come up if there is a pirate aboard the ship you are attacking is engaged in the Duty Navigation puzzle, and is doing better than you at navigation. What does this mean? It means that you can avoid being attacked by doing well on the Duty Navigation puzzle.
Introduction[]
The navigation puzzle is built on a circular board that is divided into 8 even octants. The board contains 3 concentric circles starting from smallest at the center moving out. Each octant on each circle can hold one star. Because of this, the board has a maximum capacity of twenty-four stars at any given time. The basic duty navigation board looks like this:

Stars will fall from the outside of the board at random towards the center. They will fall as far in as they can and stop if their path is blocked by another star. There is a constant gravitational pull on all the stars towards the center during the entire puzzle and if a ring is rotated so that a star appears over an open space below it, it will fall towards the inner ring.
Stars are both color and shape coded. There are five colors that stars can be each with its own distinct shape: Blue, red, orange, yellow, white. The object of navigation is to match these colors and shapes with hollow markers on the board that indicate where the corresponding stars should lie when the constellation is finished. To complete a constellation, all the markers must be correctly filled at the same time. Stars will also disappear off the board if they are cleared by lining three or more up in a row either vertically, or horizontally.
Controls[]
To control the stars, use the arrow keys. The up and down arrows will move between the circle levels with down moving towards the center of the board and up moving away from it. The left and right arrows will rotate the pieces on the currently selected circle level with right rotating the pieces clockwise and left rotating them counter-clockwise. The space bar will cause the piece currently falling to fall extremely fast and land where it is targeted for.
Basic constellations[]
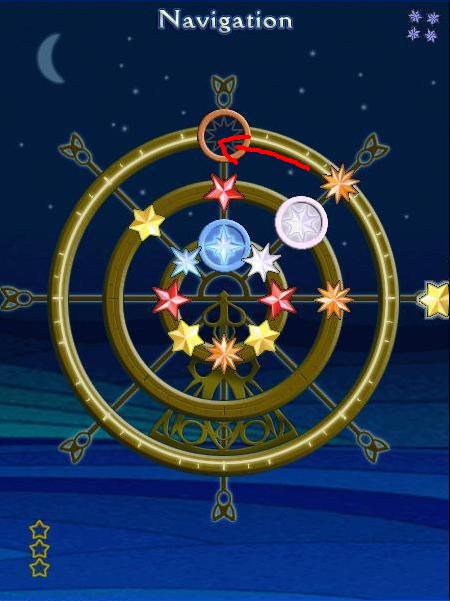
When first starting off navigation, a player will have constellations with anywhere from one to four stars. Because of this, getting good scores at the beginning is very difficult. The following examples are meant as guidelines. Most of the constellations are already set up with a brief explanation of what to look for when forming your board. Here is a typical early board:

By rotating the second ring once clockwise, the orange star now fills the orange marker while the white star on the first ring is filling the white marker and the constellation is completed.
It is generally a good idea to try to get as many different color stars in the bottom row as possible before moving onto the second one. This allows for a better chance that you will have the correct color already on the bottom row for the next constellation and can move immediately to placing the second and third rows.
As a player advances farther into navigation, the constellations will become more complex and include more stars. Often, they will have multiple stars on a single circle and require manipulation around sets of two to avoid clears that may throw off the final constellation. The following are examples of basic two and three star constellations:


In plate 3, the first ring was filled up quickly once the yellow was acquired and placed correctly so that the second ring could then be filled as a base for the orange necessary in the third ring to rest on. A turn of the third ring counter-clockwise will complete the constellation.
In plate 4, much the same procedure was used except that once the blue was acquired and placed the next step was to get a white on the second row with enough stars to the left of it to allow the orange to rest on top. While it is often helpful to have a variety of colors on a single row, it is rarely necessary to fill an entire row before building on top of it. Often, that is detrimental to having a head start on the next constellation. A turn of the third ring counter-clockwise will finish the constellation in plate 4.
As mentioned above, it is often better to leave open spots in the base rings when possible if it is not necessary to fill them. This leaves that spot open for the next constellation should the color or colors you want not already be in the first ring. In the following example, it was necessary to begin placing the stars on the second ring until a yellow was found that could finish the constellation in the first row.


Had that spot been filled before the yellow was acquired, it would have wasted time and stars to clear it out and then place the yellow correctly. A single turn of the second row clockwise will allow the yellow to drop in and complete the constellation.
Advanced constellations[]
In order to increase score and improve the effect that a player's navigation has on the sailors, it is often possible to create combos to complete constellations. In the following example, a single combo will be used to finish the constellation:


In plate 6, the bottom row was filled first ensuring that the orange and two yellows were in the correct positions and filling in the spaces between them. Then, two whites were place side by side with open space to the left of them and a base to rest the third row on to the right. As the pieces came down, the top row was filled also cycling extras down to the second so that a yellow would end up to the right of a white with empty space to the left of it. A single turn of the third row clockwise will finish the constellation.


Plate 7 the white drops down, it clears the three whites in a row on the second circle allowing the yellow to fall down to the second level, fill the marker, and complete the constellation. This is the result:


There will be a few instances in which a combo or well placed order of stars is necessary to completing a constellation. Note the following example:


Plate 9 is a rare but easily conquered situation. Because the required markers place three white stars in a row on the bottom level, this constellation is impossible to complete unless one of the whites on the bottom level is the last star to be filled.
Note: The filling of a constellation will always supersede a standard three star clear. In this example, if all other markers are filled when the last white is placed on the bottom level, the constellation will complete instead of the three whites clearing. However, if the rest of the constellation is not complete, the three whites will clear as normal causing the player to have to redo the bottom level.
When faced with a situation like this, careful set up is required. As seen in plate 9, the first two whites were filled on the bottom level with the blue becoming a place holder for the third one. The second row was filled ensuring that the required yellow would line up with the marker while placing a blue on top of the blue on the first layer setting up a standard clear. After that, the third row was filled ensuring that from left to right there was a blue, white, and red. The blue to clear the three vertical blues and open up the last spot for the white, and the white and red to simultaneously fill the markers and clear the constellation. The movement looks something like this:


From the setup, a simple turn of the top row clockwise once clears the blues and then once more drops the white to complete the bottom level and fills the red marker to complete the constellation. This type of combo generally raises the score and sparkliness of the indicator greatly. The final result:

These are basic tips that will work no matter what the size of the constellation. The end goal is always to fill all of the markers.
Tips and guidelines[]
- Plan ahead. Give each row a variety of colors as you fill them. This helps during the next constellation to give you a better chance of already having the right colors in place and saves some time.
- It is not a requisite to fill each level as you go up. In addition to diversifying the colors as much as possible, leave some empty spaces on the lower levels. This helps in the next constellation by having open spots to move the correct colors into instead of having to clear some prior to forming the board.
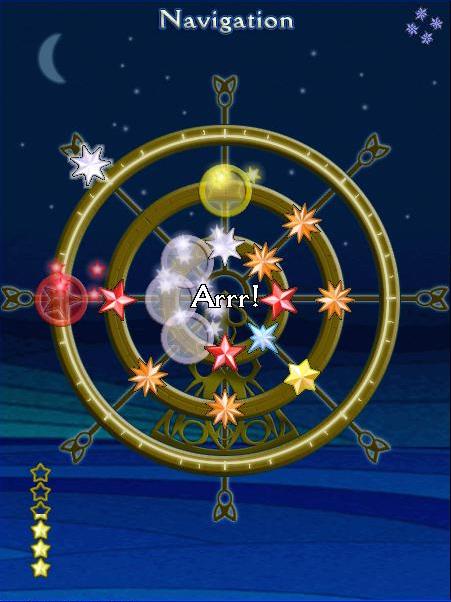
- It is always very hard to get anything higher than a fine when just beginning navigation. This is because the starting constellations are all so small. In order to raise your rank relatively fast and work up to the large constellations quicker, chart for a very long voyage and don't leave the navigation puzzle. Each time you fill up the stars along the lower left you will see this:


The more stars filled up in the lower left corner the bigger the constellation and the higher the score.
- T'is better to have booched and loved than never to have booched before. If you get to a board where there are no clears present and it's obvious there is no way to avoid a booch, don't leave the puzzle. It is far better for your score to take the booch and work up again with a still swirling indicator than it is to quit out and start from scratch.
Note - Booching the puzzle will cause the ship to turn around. Also, stating that booching is better than exiting and re-entering the puzzle has come under some debate from various sources at various times. Excerpts of some discussion on the point can be seen in this thread.
- Practice a lot. Learn to anticipate clears and easily set up combos. It just becomes second nature and is a lot easier to auto-nav on the bigger constellations.
- Speed is a must. In this type of puzzle, taking too long to think can vastly lower the score. If possible, just keep moving, even if you have to clear a few colors to fix mistakes later lost time is devastating to the nav score.
External links[]
- Muffynz's Original Planning and Design Thread for this Tutorial
- Fullbeard's Illustrated Navigation Tutorial
- Jacksparrow's Illustrated Navigation Tutorial (no longer has images embedded)
- Navigation Puzzle Tips
- Sart's Navigation Video
- Scarymuffin's Navigation Video
- Rixi's Navigation Video
- Muffynz's Navigation Video